Kamis, 24 November 2011

IGOS Nusantara 2011(vb2)

Setelah melalui beberapa perbaikan dan penambahan fitur, IGOS Nusantara 2011 (kode rilis IGN 2011) versi beta 2 telah tersedia dalam versi LiveCD dan LiveUSB. ISO image IGN 2011 beta 2 tersedia di http://repo.igos-nusantara.or.id/iso/2011/beta/. Pengguna bisa membakar ISO Image menjadi LiveCD atau LiveUSB.
Adapun fitur-fitur yang ada pada IGN 2011 beta 2 antara lain adalah Firefox 4.0.1, Libreoffice 3.3.2, GNOME Media Player 1.0.2, Pidgin 2.7.11, Inkscape 0.48, GIMP 2.6.11, dan emulator aplikasi Windows dengan Wine 1.3.18. IGN 2011 beta 2 menggunakan kernel 2.6.38.6. Ribuan paket juga telah tersedia di repositori IGN 2011. Dibandingkan dengan IGN 2011 versi sebelumnya, IGN2011 beta 2 telah menyertakan lebih banyak driver/firmware sehingga dapat mengenali lebih banyak perangkat keras (motherboard, prosesesor, chipset, harddisk, kartu suara, kartu ethernet, USB2, USB3, Printer, GSM/CDMA Modem, Ethernet, Wifi, dsb) secara langsung.

Berikut beberapa tangkapan layar IGN2011 beta2. Untuk tampilan lain dan ukuran gambar dengan resolusi penuh, silakan lihat dari repositori grafik.

Tampilan Desktop


IGOS Nusantara 2011 Beta2


Kertas Dinding (Wallpaper) Monumen Nasional
Kontributor: Farhan Perdana (a.k.a Blek)
IGOS Nusantara 2011 Monumen Nasional

Kertas Dinding Pantai Ampenan Lombok
Kontributor: Iwan (Fotografer), Basuki Ariwibowo (Pengirim Foto)
IGOS Nusantara 2011 Pantai Ampenan Lombok

Kertas Dinding Pulau Tidung
Kontributor: Muhamad Faozy (2klik.com)
IGOS Nusantara 2011 Pulau Tidung (1)
IGOS Nusantara 2011 Pulau Tidung (2)

Kertas Dinding Karimunjawa
Kontributor: Acha Mardiyansyah

IGOS Nusantara 2011 Karimunjawa

Kertas Dinding Simanindo – Sumatra Utara
Kontributor: Yulian Firdaus Hendriyana
IGOS Nusantara 2011 Simanindo - Sumatra Utara

Kertas Dinding Penari Bali
Kontributor: Hendy Hertiasa, Anggi A Sundadjaja (alm.), dan Widianto Nugroho
IGOS Nusantara 2011 Penari Bali

Kertas Dinding Barong
Kontributor: Hendy Hertiasa, Anggi A Sundadjaja (alm.), dan Widianto Nugroho
IGOS Nusantara 2011 Barong

Kertas Dinding Batik Burung
Kontributor: Hendy Hertiasa, Anggi A Sundadjaja (alm.), dan Widianto Nugroho

IGOS Nusantara 2011 Batik Burung

Kertas Dinding
Kontributor: Hendy Hertiasa, Anggi A Sundadjaja (alm.), dan Widianto Nugroho

IGOS Nusantara 2011 Kresna

Tampilan Aplikasi Terpasang
IGN2011 Aplikasi Terpasang


Tampilan Aplikasi Aktif
IGN2011 Aplikasi Aktif


Tampilan Status Koneksi on
IGN2011 Status Koneksi on

Tampilan Buka Folder Rumah

IGN2011 Buka Folder Rumah

Tampilan Pengait Media Eksternal
IGN2011 Media Eksternal

Tampilan Menu Pengaturan Sistem

Selasa, 22 November 2011

install LAMP - Apache, MySQL & PHP on Ubuntu 11.10

step 1. Installing Apache

Apache on Ubuntu
Open terminal (press Ctrl+Alt+t) and execute the command -
sudo apt-get install apache2
The above command will install some default modules, packages and libraries but you later install the ones you need. When installation is completed, type the address http://localhost in the browser address bar and you will get a default apache page like this -

apache-default-page

step 2. Installing MySQL

MySQL

  Execute the command -
sudo apt-get install mysql-server
and enter the root password during installation procedure. I’ve already covered a post in detail about how to install MySQL on Ubuntu 11.10.

step 3. Installing PHP

Execute the command -
sudo apt-get install php5 libapache2-mod-php5 php5-mysql
Then restart the Apache server to load php modules -
sudo /etc/init.d/apache2 restart
To test whether the PHP 5 has been successfully installed or not, create a file phpinfo.php and copy the following content (to the file) -
<?php
print_r (phpinfo());
?>
and put the file in root web directory (/var/www). Then open the address http://localhost/phpinfo.php, then it should display the php configuration details like this -
testing php on Ubuntu
That’s All.. Linux (Ubuntu is itself a Linux based OS), Apache, MySQL and PHP i.e all the components of LAMP has been installed successfully.
To manage MySQL database from a GUI, You may like to install phpMyAdmin – The MySQL web administration tool, a great application for managing – creating and maintaining MySQL database.

How to install phpMyAdmin on Ubuntu 11.10 ?

just execute the command -
sudo apt-get install phpmyadmin
When the installation is complete, move on to http://localhost/phpmyadmin and login (using the MySQL login username(default is ‘root’) and the password (you entered during installation)) to start using it.
Want to learn web server administration (with LAMP) on Ubuntu Server ?
Having apache, MySQL, PHP installed locally on your system is good for learning about the server administration and other cool/great stuffs related to Linux but VPS is very cheap these days so you may want to try Ubuntu (with Apache or other web server) on a VPS for much better (and real) experience – I’ve been using Linode VPS @ $19.95/month (512 MB RAM, 20 GB space and 200GB bandwidth) for a while, and I am loving it.


Sumber : http://blog.sudobits.com/2011/10/28/how-to-install-lamp-apache-mysql-php-on-ubuntu-11-10/

Installasi XAMPP di Ubuntu 11.10

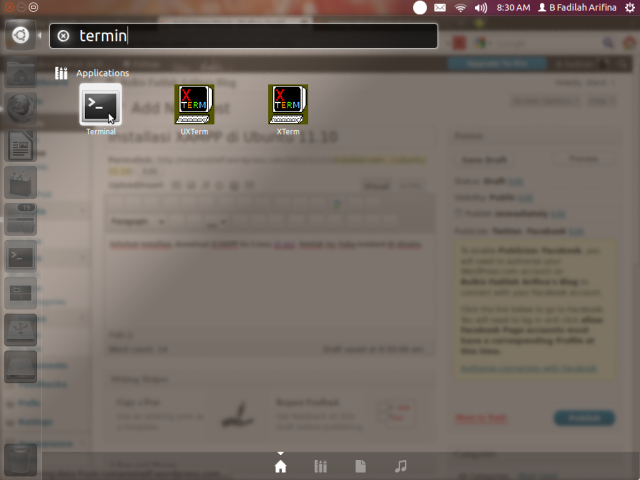
Sebelum installasi, download XAMPP for Linux di sini. Lalu pindahkan file xampp yang berbentuk .zip ke /home . Setelah itu, buka terminal di ubuntu.

Setelah terminal terbuka ketikkan:
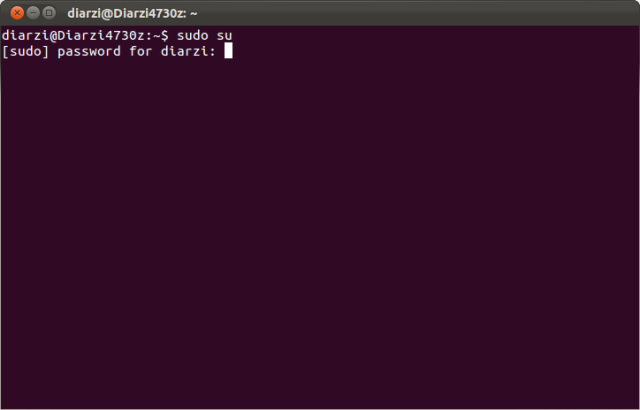
sudo su
kemudian masukkan password ubuntu anda.

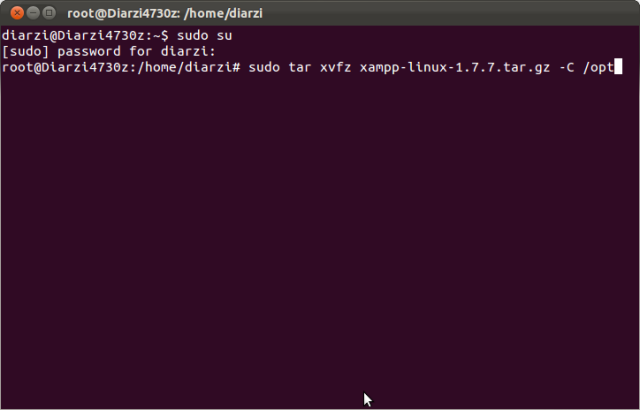
Setelah itu lakukan pengekstrakan file dengan mengetikannya pada terminal:
sudo tar xvfz xampp-linux-1.7.7.tar.gz -C /opt
Kemudian tunggu hingga ekstraksi selesai. Jika sudah, xampp akan terinstall di dalam /opt/lampp.
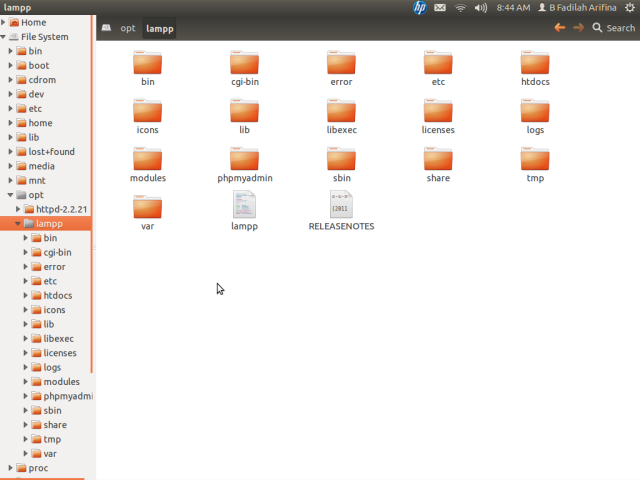
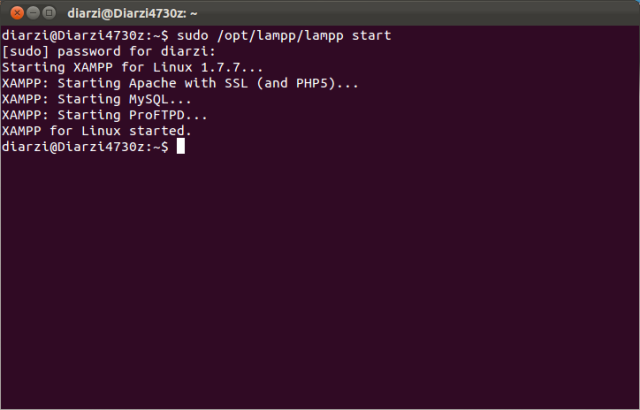
Untuk menjalankannya kita ketikkan kodingan seperti ini di terminal:
sudo /opt/lampp/lampp start

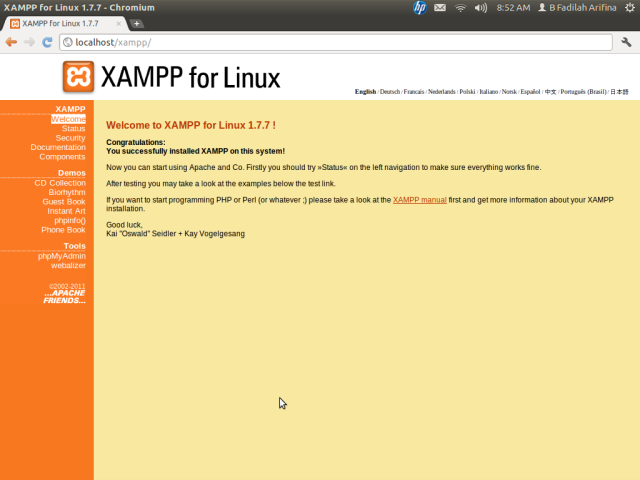
Untuk menjalankannya yaitu dengan membuka browser dan mengetikkan alamat url:
http://localhost/xampp
maka akan menampilkan:

XAMPP pun siap untuk digunakan.


Sumber:
http://romanistielf.wordpress.com/2011/11/11/installasi-xampp-di-ubuntu-11-10/

Cara install Apache, MySQL, PHP dan PhpMyAdmin di ubuntu 11.10

Baru saja upgrade ubuntu saya dari 11.04 ke ubuntu terbaru 11.10 seperti biasa sekedar berbagi yang saya ketahui tentang cara install dan konfigurasi Apache, MySQL PHP, dan PHPMyAdmin di ubuntu 11.10. Untuk itu simak langkah-langkahnya di bawah ini.


Install Apache
Untuk install apche masuk ke terminal dan ketikkan
    sudo apt-get install apache2
masukkan password super user anda
Do you want to continue [Y/n]? y
Setelah itu selesai instalasinya, buka browser dan masukkan alamat ini
    http://localhost 
Install PHP 
Selanjutnya adalah menginstall PHP, ketikkan perintah berikut di terminal
sudo apt-get install php5 libapache2-mod-php5
seperti biasa system akan meminta anda untuk memasukkan password super user.
Do you want to continue [Y/n]? y
Tekan y untuk menyutujui. Setelah selesai instalasi PHP. Sekarang anda restart apache-nya dengan perintah
sudo /etc/init.d/apache2 restart
untuk menguji berhasil atau tidaknya PHP yang baru saja kita install, buatlah sebuah file dan simpan di /var/www/nama_file_anda.php atau coba ketikkan perintah ini di terminal anda
sudo gedit /var/www/phpinfo.php
Maka setelah anda memasukkan password super user, muncullah jendela beru yang berupa text editor. masukkan kode dibawah ini lalu simpan dokumen.
<?php phpinfo() ?>
Selanjutnya anda langsung buka browser, dan masukkan alamat berikut
http://localhost/phpinfo.php
Apabila semuanya berhasil maka akan tampak seperti ini. Untuk saat ini instalasi PHP sudah selesai, lanjut ke langkah berikutnya


Install MySQL
MySQL disini berhubungan dengan database kita, jadi untuk menginstallnya anda hanya perlu mengetikkan perintah berikut ke terminal
sudo apt-get install mysql-server
password super user dibutuhkan untuk menginstall MySQL, seperti biasa masukkan password anda dan tekan enter
Do you want to continue [Y/n]? y <- tekan y
Setelah beberapa saat akan muncul perintah untuk memasukkan password buat user 'root'. User dan password ini digunakan apabila anda menggunakan MySQL, jadi ingat baik-baik password anda.
Ulangi password yang anda masukkan
Sampai disini Install MySQL selesai, selanjutnya komponen terahir yang perlu di install untuk membangun webserver yaitu PhpMyAdmin

Install PhpMyAdmin
Ketikkan perintah ini diterminal
sudo apt-get install phpmyadmin
setelah memasukkan password super user, maka setelah beberapa saat akan muncul perintah untuk memasukkan web server yang digunakan untuk menjalankan PhpMyAdmin, karna diawal kita menginstall apache2, otomatis pilihlah apache2 sebagai web servernya

dan pilih No ketika mengkonfigurasi phpmyadmin

selanjutnya, ketik perintah di terminal
sudo cp /etc/phpmyadmin/apache.conf /etc/apache2/conf.d
 Restart apache2
sudo /etc/init.d/apache2 restart
untuk melihat hasilnya, masukkan alamat dibawah ini ke browser. Login lah sebagai root dengan password yang telah anda buat.

selesai sudah Cara install apache, mysql, php dan phpmyadmin di ubuntu 11.10, walaupun masih awam dalam sistem operasi linux namun tidak mengecilkan semangat untuk saling berbagi. Semoga bermanfaat

Senin, 21 November 2011

Tutorial Dasar Koneksi PHP dan Mysql

Pada tutorial kali ini, kita akan mencoba melakukan operasi – operasi dasar pada PHP MySQL.
1. Membuat koneksi
<?php
$hostmysql = “localhost”;
$username = “mysqlusername”;
$password = “mysqlpassword”;
$database = “namadatabase”;

$conn = mysql_connect(“$hostmysql”,”$username”,”$password”);
if (!$conn) die (“Koneksi gagal”);
mysql_select_db($database,$conn) or die (“Database tidak ditemukan”); >

Penjelasan Script:
a. mysql_connect
digunakan untuk membuat koneksi dari PHP ke server MySQL. Data mengenai hostname, mysql username, dan password yang digunakan telah diwakilkan oleh variabel $hostmysql, $username, $password. Penulisannya akan sama dengan:
mysql_connect(“localhost”,”username”,”password”);
b. mysql_select_db
untuk memilih database yang akan digunakan.
c. if (!$conn) die (“Koneksi gagal”);
jika koneksi gagal dibuat (!$conn), maka akan muncul pesan kesalahan
Setiap operasi PHP yang berhubungan dengan MySQL, akan membutuhkan sintaks diatas. agar lebih mudah, lebih baik disimpan terlebih dahulu dengan nama konfig.php. Jika sintaks tersebut dibutuhkan lagi, maka kita melakukan include terhadap file konfig.php tersebut.
2. Membuat tabel pada MySQL
<?php
include (“konfig.php”);
mysql_query(“CREATE TABLE user (
namadpnVARCHAR(20),
namablkg VARCHAR(20),
negara VARCHAR(20))”); ?>

Penjelasan script:
1. include (“konfig.php”);
perintah include digunakan untuk mengikut sertakan sebuah file (pada contoh diatas adalah file konfig.php).
2. mysql_query
format umum dari perintah ini adalah mysql_query(string dari query).
mysql_query akan sering dijumpai pada artikel kali ini.
3. Memasukkan data pada tabel
<?php
include (“konfig.php”);
$insert = “INSERT INTO users (namadpn,namablkg,negara)
VALUES (‘Saya’,'Sendiri’,'Indonesia’)”;
mysql_query($insert) or die (“tidak dapat memasukkan data ke tabel”);?>

4 . Menampilkan data dari tabel
<?php
include (“konfig.php”);
$query = “SELECT * FROM user”;
$result = mysql_query($query);
$numrows = mysql_num_rows($result);
while($row = mysql_fetch_array($result)){
echo “Jumlah data: $numrows <br>”;
echo “Nama Depan: $row[namadpn] <br>”;
echo “Nama Belakang: $row[namablkg] <br>”;
echo “Negara: $row[negara]“;
} ?>

Penjelasan script:
1. mysql_num_rows
digunakan untuk menghitung jumlah baris yang didapat dari hasil eksekusi query (mysql_query).
2. while ( ) {
}
digunakan untuk melakukan perulangan selama data yang yang diinginkan masih ada. (dalam contoh diatas: akan menampilkan semua isi dari table).
3. mysql_fetch_array
menampilkan data dari tabel dalam bentuk array
Untuk penggunaan lainnya (hapus, update, dsb) yang berubah hanya string query-nya saja.

Sabtu, 19 November 2011

Insert CSS dan JavaScript di CI.

Insert CSS dan Java Script di CI di letakkan di view, yaitu dengan cara :
- Insert CSS :
<link rel=”stylesheet” href=”<?=base_url();?>css/mainutama.css” type=”text/css”
media=”screen, projection” />


Pada script di atas, file css dengan nama file:mainutama.css yang berada di folder css di insert.
Letak folder css sendiri ada nya di root.


- Insert JavaScript :
<script type="text/javascript" src="<?=base_url();?>javascript/addhtmlcontrols.js"></script>
Pada script di atas, file javascript dengan nama file:addhtmlcontrols.js yang berada di folder
javascript di insert. Letak folder javascript sendiri ada nya di root.

Jumat, 18 November 2011

Library Uploading File di Framework CI

Adalah library untuk upload file ke server dan di simpan di folder tertentu. Folder tempat
penyimpanan file di buat write accessible. Ukuran max di php.ini juga di atur agar sesuai
dengan yang kita inginkan. Perhatikan baris berikut pada php.
file_uploads=on // Buat menjadi on
post_max_size = 2M // Edit ukuran file nya sesuai dengan yang anda inginkan.
upload_tmp_dir=”/opt/lampp/htdocs” // Folder ini harus write accssible
Setting upload nya adalah sbb :
   $config['upload_path']='./uploads/';  // Folder penyimpanan file. Musti Write accessible
   $config['allowed_types']='gif|jpg|png';
   $config['max_size']='100';
   $config['max_width']='1024';
   $config['max_height']='768';
 
  $this->load->library('upload',$config);
  // Jika kita meletakkan library uploading file di dalam file autoload.php, maka syntax di bawah
      ini  yang perlu kita taruh :
      $this->upload->initialize($config);
$this->upload->do_upload()
      Fungsi : Untuk melakukan eksekusi uploading file
      Contoh :
     <?php
      class Upload extends Controller {
function Upload()
{
parent::Controller();
$this->load->helper(array('form', 'url'));
}
function index()
{
$this->load->view('upload_form', array('error' => ' ' ));
}
function do_upload()
{
$config['upload_path'] = './uploads/';
$config['allowed_types'] = 'gif|jpg|png';
$config['max_size'] = '100';
$config['max_width']  = '1024';
$config['max_height']  = '768';
$this->load->library('upload', $config);
if ( ! $this->upload->do_upload())
{
$error = array('error' => $this->upload->display_errors());
$this->load->view('upload_form', $error);

}
else
{
$data = array('upload_data' => $this->upload->data());
$this->load->view('upload_success', $data);
}
}
}
?>
 Agar form dapat melakukan uploading file, maka tipe enctype suatu form haruslah berbentuk
multipart/form-data.
 <form method=”post” enctype=”multipart/form-data”>

Membuat “Hello World” di framework CI

Berikut kita akan mempraktekan pemrograman php dengan CI. Kita akan menampilkan tulisan
“Hello World” ke dalam browser kita.
Langkah-langkah nya adalah sbb :
a.) Buka Text Editor anda. Lalu buatlah sebuah controller di dalam direktory CI anda, yaitu di :
      system/application/controllers.
b.) Tulis lah code sbb :
<?php
class Hello extends controller
{
    function index()
    {
       $this->load->view('helloview');
    }  
}
?>
Beri nama file hello.php.
      Yang musti di perhatikan :

  • Nama class harus di awali huruf besar.
  • Nama class harus sama dengan nama file.
  • Function index adalah function default. 
Di url tidak perlu di tuliskan nama function index nya. Kalau nama function selain index, perlu di tulis di url nya.
c.)  Buat file baru dengan nama helloview.php di system/application/views
      Tulis code sbb :
     <?
           echo “Hello World”;
      ?>
d.) Misal base_url : http://localhost/ci, maka jalankan di url anda menjadi :
http://localhost/ci/hello. Maka akan muncul hasil nya.
2. Membuat Form dengan CI
    Form pada CI dapat di buat dengan menggunakan helper atau  dengan syntax html biasa.
Pada kesempatan kali ini, kita akan mencoba membuat form dengan menggunakan helper.
   Buatlah sebuah controller. Ketik code berikut :
<?php
class Form extends Controller
{
    function index()
    {
       $this->load->view('form');
    }
function jumlah()
    {
        $angka1=$this->input->post('angka1');
        $angka2=$this->input->post('angka2');
        $hasil=$angka1+$angka2;
        echo "Hasil nya adalah : $hasil";
        echo "<br />".anchor("form/index","Kembali");
    }
} ?>

Beri nama file “form.php”.
Buat sebuah view dengan nama “form.php” . Ketikkan code sbb :
<html>
<head>
   <title>Membuat Form input penjumlahan dengan CI</title>
</head>
<body>
<table>
<? echo form_open('form/jumlah');
      $data1=array(
                    'name' => 'angka1',
                    'size'=>'15');
       echo "<tr><td>Angka 1</td><td> :</td><td>".form_input($data1)."</td></tr>";
        $data2=array(
                    'name' => 'angka2',
                    'size'=>'15');
       echo  "<tr><td>Angka 2</td><td> :</td><td> ".form_input($data2)."</td></tr>";
       echo  "<tr><td>".form_submit('mysubmit','Ok') ;
       echo    " ".form_reset('mysubmit','Clear')." </td></tr>";
?>
</table>
</body>
</html>
Pada contoh di atas kita load helper di file autoload.php untuk load secara otomatis.
$this->load->helper('form');
Helper yang kita gunakan, kita input di view. Syntax yang di gunakan adalah :
- form_open ('form/jumlah')
Syntax di atas sama dengan syntax html berikut :
<form method=”post” action=”http://localhost/ciprivate/index.php/form”>
atau, gunakan base_url(), untuk mengantisipasi perubahan pada url.
<form method=”post” action=”<?=base_url();?>index.php/form”>
Nilai base_url() di atas mengambil nilai base_url di file config.php .
- form_input ('username','sofwan')
Minimal, kita memasukkan nama field dan value pada syntax form_input.
Jika menggunakan parameter yang lebih banyak, yaitu :
$data1=array(
                    'name' => 'angka1',
                    'size'=>'15');
                     echo form_input($data1);

- form_submit('my submit','OK');
                      identik dengan :
                     <input type=”submit” value=”OK”>
         
- form_reset
         Sama penggunaan nya dengan form_reset.

Mengenal dan Instalasi Code Ignite


PHP adalah sebuah bahasa pemrograman web yang popular, tangguh dan dapat di peroleh
secara gratis. Belajar PHPcukup menyenangkan, karena bahasa ini tergolong mudah untuk di
pelajari. Untuk mempermudah dan mempercepat pengembangan aplikasi dengan PHP, banyak
bermunculan framework PHP, satu di antara nya adalah Code Igniter

Code Igniter (CI) (www.codeigniter.com) adalah salah satu framework php yang tangguh dan
popular. Code Igniter tergolong framework dengan ukuran kecil dan cukup mudah di kuasai. CI
juga datang dengan manual yang tergolong lengkap.

CI adalah sebuah php framework yang berupa kumpulan folder dan file php, java script,css,txt
dan file berbasis web lainnya dengan setting tertentu untuk menggunakannya dan menyediakan
library dan helper yang dapat di manfaatkan di dalam pemrograman php.
CI di jalankan under web dan harus dengan web server. Program CI cukup di letakkan di
bawah folder directory web server anda.
Berikut adalah struktur file CI :


1. Membuat “Hello World” di CI
  Berikut kita akan mempraktekan pemrograman php dengan CI. Kita akan menampilkan tulisan
“Hello World” ke dalam browser kita. 
Langkah-langkah nya adalah sbb :
a.) Buka Text Editor anda. Lalu buatlah sebuah controller di dalam direktory CI anda, yaitu di :
      system/application/controllers.
b.) Tulis lah code sbb :
<?php
class Hello extends controller
{
    function index()
    {
       $this->load->view('helloview');
    }  
}
?>
Beri nama file hello.php.
      Yang musti di perhatikan :
  • Nama class harus di awali huruf besar.
  • Nama class harus sama dengan nama file.
  • Function index adalah function default. Di url tidak perlu di tuliskan nama

function index nya. Kalau nama function selain index, perlu di tulis di url nya.
c.)  Buat file baru dengan nama helloview.php di system/application/views
      Tulis code sbb :
     <?
           echo “Hello World”;
      ?>
d.) Misal base_url : http://localhost/ci, maka jalankan di url anda menjadi :
http://localhost/ci/hello. Maka akan muncul hasil nya


Rabu, 16 November 2011

Membuat Form ComboBox Dinamis dari Database (Mysql) dengan PHP

Combobox merupakan salah satu element form yang sering digunakan dalam aplikasi – aplikasi pendaftaran, pada umumnya combobox digunakan untuk memilih salah satu option dimana terdapat banyak option yang ada. Value dalam combobox sebenarnya dapat ditulis langsung dalam html, namun, bagaimana jika data yang ingin ditampilkan sangat banyak atau tergantung pada kondisi tertentu?
Misalkan, kita ingin menampilkan pilihan kota – kota yang ada dalam negara Indonesia, maka kota yang ditampilkan juga merupakan kota yg berada dalam Indonesia.
Misalkan, user ternyata berasal dari Inggris, maka kota yang ditampilkan juga merupakan kota yg berada dalam negara Inggris.
Kita memerlukan combobox dinamis.
Ok, langsung praktik saja.
Step 1 : Persiapkan Database
  1. Buat database dengan nama db_tutorial
  2. Siapkan tabel dengan nama tb_kota, dengan struktur tabel seperti gambar dibawah ini.
  3. Insert kan beberapa sample data, seperti gambar dibawah
  4. Done!
Step 2 : Persiapkan Folder Kerja
  1. Buat folder dengan nama tutorphp dalam document root anda
  2. Simpan semua file dalam tutorial ini dalam folder tersebut.
Step 3 : Membuat script koneksi ke Database
  1. Ketikkan script berikut,
    <?php
    $host = "localhost";
    $user = "root";//adjust according to your mysql setting
    $pass = ""; //adjust according to your mysql setting, i use no password here
    $dbName = "db_tutorial";
    mysql_connect($host, $user, $pass);
    mysql_select_db($dbName)
    or die ("Connect Failed !! : ".mysql_error());
    ?>
    
  2. simpan dengan nama connect.php
Step 4 : Membuat form combobox dinamis
  1. Ketikkan script berikut,
    <form name='form' method='post' action='prosescombo.php'>
    <h3> Choose Your City</h3>
    <select name="kota">
    <option value=0 selected>- city -</option>
    <?php
    include 'connect.php';
    $q = mysql_query("select * from tb_kota where negara = 'Indonesia' "); //choose the city from indonesia only
    
    while ($row1 = mysql_fetch_array($q)){
      echo "<option value=$row1[kota]>$row1[kota]</option>";
    }
    ?>
    </select>
    <input type="submit" name="submit" value="Submit">
    </form>
    
  2. simpan dengan nama formcombo.php
Step 5 : Membuat menampilkan pilihan
  1. Ketikkan script berikut,
    <?php
    $kota = $_POST['kota'];
    
     if ($kota == '0') {
      echo "anda belum memilih";
     } else
      echo "anda memilih ".$kota;
    ?>
    
  2. simpan dengan nama prosescombo.php
Step 6 : Testing Code
  1. Pergi ke http://localhost/tutorphp/formcombo.php. Anda akan melihat form seperti dibawah. Pilih salah satu option (Disini saya memilih Solo)
  2. Klik Submit dan anda akan melihat hasilnya
OK. Haaaaaaaapppy Coding! :D

Senin, 14 November 2011

INSTALL TWITTER CLIENT APPLICATION IN UBUNTU 11.10

Turpial is Open Source twitter client application writes with python, though my opinion turpial is the best twitter client application ever which run in Ubuntu compared with Choqok, qtwit even gwibber. Turpial have good a appearance (some point having good icons), performance (you have a lot of setting inside), and User Friendly GUI that make us quickly to understand some function that available. 
Turpial 1.5
What features inside turpial 1.5 ?
Turpial 1.5 have a great features inside, therefore we call it 'the best twitter client application' in ubuntu, the features are :
  • Turpial support single column view and multicolumn view (if you are using Multicolumn view it's look like tweetdeck).
  • Colored tweets according to their status (yellow when read. blue when unread, etc).
  • Besides of twitter, tupial has Support with Identi.ca.
  • Enhanced Notifications (with further options).
  • Autoscrolling
  • Customizable image hosting place for uploaded images.
  • Customizable preferred service for shorten url service.
Turpial with Multicolumn view uploading some Images

Download/Install Turpial 1.5 via PPA
Turpial now comes to version 1.5, for ubuntu user you can install turpial via PPA that maintain byeffie-jayx, do following to install turpial 1.5 in Ubuntu 11.10 Oneiric :
  • sudo add-apt-repository ppa:effie-jayx/turpial
  • sudo apt-get update
  • sudo apt-get install turpial

UBUNTU 11.10 IN MACBOOK PRO

After that, we google it to find more information, here summary of Install Ubuntu 11.10 Oneiric Ocelot in MacBook Pro.

Unlike Ubuntu 11.04, Ubuntu 11.10 Oneiric Ocelot recognize almost all hardware of MacBook Pro and some of them works out of the box without any setting such us : VGA Intel HD, Multitouch Trackpad, FacetimeHD Camera, Sound, CardReader, Monitor brightness and Keyboard Bakclight. When I was looking for any reference on the net some errors that we encountered among others Bluetooth and MacBook Pro Wireless. Here some required setting to install Ubuntu 11.10 in Macbook Pro

Instal Ubuntu 11.10 MacBook Pro
before it's start, you should read my previous article here, step by step to install Ubuntu 11.10 on MacBook Pro was actually same as there, some things you need to change is the ISO, change the ISO with Ubuntu 11.10 for MAC (64-bit), download through following address :
Download Ubuntu 11.10 ISO for Mac 64bit

Fix Setting MacBook Wireless 
Some of MacBook Pro Series having a trouble in wireless, there are two option regarding this problem. you can use third party application/driver emulator like ndiswrapper or do patching the kernel, but we suggest you to do the last option that is patching the kernel, because people having trouble like system suddently freeze, and over heating when use ndiwswrapper. Read my following article to fix Broadcom BCM4331 Problem (use in MacBook Pro 8.1).
Setting MacBook Pro Wireless

Fix Setting MacBook Bluetooth
Some MacBook Pro having problem with the Bluetooth (ex:MacBook Pro 6.0) but not all, If you experience this install btusb-dkms from MacTel PPA, do as following :
  • sudo add-apt-repository ppa:mactel-support && sudo apt-get update
  • sudo apt-get install btusb-dkms
Note: some people having trouble with Bluetooth in Ubuntu 11.10 (not only MacBook), as we mention today, there is update for Bluetooth tools and daemons, Bluetooth ALSA daemons, and Bluetooth printerdriver for CUPS. So  update immediately after finish installing Ubuntu 11.10.

Fix Setting Mouse and Touchpad
Your MultiTouch and trackpad is works, right ? to get more setting of them go to System Settings > Mouse and Touchpad. See the image bellow.

Ubuntu 11.10 setting multitouch setting for MacBook Pro

Some additional application which help you to configure multitouch is Touchégg, Touchégg is a multitouch gesture recognizer for GNU/Linux that allows associating actions to each gesture.


Touchégg GUI Interface
Touchégg is available in both 32bit and 64bit as deb, download and install Touchégg as following
  • wget http://touchegg.googlecode.com/files/touchegg_0.2-maverick_amd64.deb
  • wget http://touchegg.googlecode.com/files/touchegg-gui_0.2-maverick_amd64.deb
  • sudo dpkg -i touchegg_0.2-maverick_amd64.deb && sudo dpkg -i touchegg-gui_0.2-maverick_amd64.deb

Fix for Touchpad Trouble in Ubuntu 11.10

One of the issues introduced by Ubuntu 11.10 on my Eee PC 901 is touchpad dragging. The tap-and-drag gesture, for moving the cursor with the mouse button depressed, is too sensitive. I have to tap as fast I can to activate the gesture every time.
Today I pursued the bug report for this issue to find a fix. It didn’t take long to find a workaround using synclient, which is a utility for manipulating options for Synapticstouchpads. Run this command to get the timeout before a tap is interpreted as a single tap:
synclient | grep "SingleTapTimeout"
On my system this option was set to 180, which is too fast. Run this command to double the timeout to 360:
synclient SingleTapTimeout=360
At this point, tap-and-drag should be much easier like in Ubuntu 11.04. But for me, it highlighted a second problem: there was a slight delay before any regular tap would register on the screen. This was very visible in the file browser, where there was a visible delay between tapping a file and that file becoming selected.
Enabling the “FastTaps” option fixes the delay issue:
synclient FastTaps=1
Now on top of touchpad dragging being fixed, the whole system feels more responsive! I hope that I haven’t been using Ubuntu on this netbook with FastTaps disabled all these years. All of the synclient options are documented in the synaptics manpage.
Changes made by synclient are not persistent across reboots. The proper way to set these options would be using Xorg configuration files. For now, I’ve just added the twosynclient commands to Startup Applications to run automatically when I log in.