Selasa, 25 Oktober 2011

3 Model Laptop Acer Terbaru 2011


acer-3935-and-gemstone-rm-eng
Anda sedang mencari laptop Acer baru? Mungkin ini bisa menjadi salah satu referensi buat Anda bila pilihan Anda jatuhkan pada merk Acer. Kali ini kami tidak hanya menginformasikan 1 model terbaru, tapi kami menunjuk 3 jenis model Acer terbaru
Buat Anda yang ingin memiliki laptop yang lumayan imut, bisa jadi Aspire 3935 memang cocok buat Anda. Tidak terlalu besar atau tidak terlalu kecil. Dengan ukuran 13,3 inchi, laptop ini memiliki resolusi 1366 x 768. Selain itu, keyboardnya juga touch-sensitive, multigesture touchpad, webcam, tiga buah USB 2.0 port, fingerprint reader, 802.11 a/g/draft-N dan 4-cell Li-ion baterei.
Ada lagi, selain itu laptop merk Acer yang patut menarik perhatian kita adalah tipe T7350. Laptop jenis ini dibekali 2GHz Intel Core 2 Duo, dengan grafis 4500MHD, 8x DVD writer, 3Gb RAM, 250Gb HDD dan Vista Home Premium SP1.
Nah, jika Anda ingin mencari yang lebih powerfull, ada model terbaru yaitu 8935G Gemstone PC dengan layar yang sangat lebar 18.4 inchi, menggunakan Intel Core 2 Duo, ATI Mobility Radeon HD 4670, 1080p resolusi, 4x Blu-Ray writer, 500Gb HDD yang dapat diupgrade menjadi 1TB. Wuah, ini pasti bisa menampung banyak file dan tentunya cocok sekali buat mereka yang senang mengkoleksi video atau musik dalam jumlah yang besar. Ketiga jenis laptop ini secara resmi akan dipasarkan sekitar bulan Juni 2009 mendatang. Nah, siap-siap nabung dari sekarang ya kalau ingin memiliki 1 dari ketiga laptop Acer ini!

Konten Blogger Lama Yang Tidak Dimigrasi Ke Sistem Account Google Akan Dihapus

Apakah Anda salah satu pengguna Blogger? Kalau Anda yang telah bergabung dan memiliki account sebelum tahun 2007 maka berhati-hatilah kalau belum melakukan upgrade ke Google Account yang baru, pasalnya berdasarkan aturan yang baru setelah Blogger diakuisisi oleh Google kabarnya pihak Google Blogger akan segera menghapus account dan blog lama penggunanya tersebut. Oleh karenanya Anda diperkenankan untuk memiliki account Google terlebih dahulu sebelum bisa mengakses Blogger nantinya.
Sebagai salah satu akuisisi pertama yang dilakukan pihak Google beberapa waktu yang silam, proses integrasi Blogger dengan produk Google kabarnya masih mengalami hambatan dan belum selesai. Delapan tahun setelah mengakuisisi Blogger, pihak Google akhirnya mengakhiri dukungannya terhadap account warisan Blooger yang lama dengan memberi dukungan yang baru terhadap  account Google secara menyeluruh.
Sebelumnya Blogger menggunakan sistem account sendiri sampai tahun 2006 dan baru mulai bermigrasikan penggunanya pada tahun 2007. Selama empat tahun itu ternyata intergrasinya sendiri tidak dilakukan sebagaimana mestinya, sehingga pada akhirnya Google Blogger memutuskan akan segera menghapus dukungan bagi account penggunanya yang lama. Tidak hanya akan account lama saja yang berhenti bekerja, tetapi blog yang terkait dengan pengguna lamanya pun tersebut tentunya juga akan segera dihapus jika penggunanya tidak segera bermigrasi ke sistem yang baru pada bulan 25 Juni 2011 yang akan datang.
“Untuk sejumlah alasan teknis dan operasional, Kami telah memutuskan untuk menghentikan dukungan Kami terhadap semua account warisan dan blog yang lama setelah tanggal 25 Juni 2011″, ungkap pihak Google Blogger.
“Jadi jika Anda memiliki account Blogger dan tidak login sejak 2007, Anda akan kehilangan akses ke account dan konten yang berhubungan secara permanen tersebut kecuali jika Anda memperbaruinya ke sistem Account Google sebelum tanggal 25 Juni 2011″, tambahnya.
Sudah barang tentu nantinya bakal akan banyak orang yang belum melakukan login sejak tahun 2007. Namun apa mau dikata, bagi Anda yang mau selamat, ya sebaiknya segera saja mengupgradenya ke sistem account google yang baru. Sedangkan sebaliknya jika tidak, ya sebaiknya cukup abaikan saja dan beralihlah ke situs layanan pembuat blog yang lain untuk membuat blog Anda yang baru.
Google Account menyediakan sistem yang sangat padat, baik dari segi keamanan dan kinerja, proses verifikasi dua langkah adalah salah satu contoh, belum lagi itu membuat cara lebih mudah bagi Google untuk hanya memiliki satu sistem terhadap semua produk-produknya. Anda dapat mengetahui lebih lanjut tentang proses di sini.
Sebelumnya Google juga menghadapi masalah yang sama di YouTube dan telah mengeluarkan peringatan serupa baru-baru ini, dan meminta para penggunanya yang belum melakukannya agar dapat melakukan login ke Youtube diwajibkan sebelumnya untuk memiliki sistem account Google terlebih dahulu.

Senin, 24 Oktober 2011

Tips Mengubah Bootscreen Windows

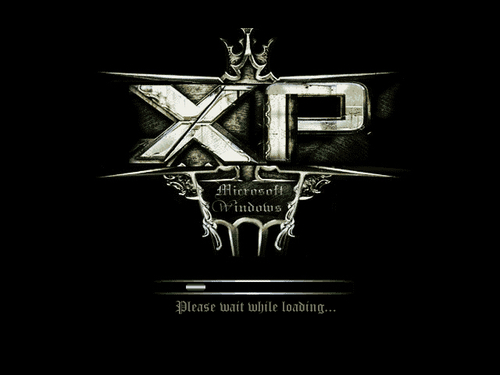
Jenuh dengan tampilan bootscreen windows xp?? saya punya beberapa tips untuk mengubah tampilan bootscreen windows sesuai keinginan kita. Caranya dengan menggunakan fasilitas utilty dari TuneUp Utilities yang bisa digunakan untuk mengubah boot screen maupun welcome screen.
Caranya sangat mudah: 
  1. Buka TuneUp Utilities. Klik TuneUp Styler 2.
  2. Untuk mengubah boot screen, klik Change the Windows XP boot screen Klik New Screen
  3. Pilih gambar yang diinginkan.
  4. Jika ingin mengatur lebih lanjut, atur pada bagian 2 dan 3. Jika tidak ingin mengatur apapun, bisa langsung ke point 4, klik Save boot screen. Beri nama boot screen tersebut.
  5. Klik boot screen buatan kita, lalu klik Instal Boot Screen
  6. Restart computer. Tampilan boot screen akan seperti gambar berikut.

Semoga informasinya bermanfaat untuk anda ^_^

Cara mudah over clock

Overclocking itu sebenernya apa sih ? Overclocking atau sering disingkat OC adalah tindakan memaksa PC untuk bekerja diatas kinerja yang sudah ditentukan oleh produsen. Efek samping dari OC adalah Overheat sampai kerusakan komponen PC, Maka dengan ini sebelum semua kasus terburuk terjadi bahwa SEGALA KERUSAKAN yang terjadi terhadap hardware anda bukan tanggung jawab penulis, atau dengan kata lain, kerusakan yang terjadi adalah tanggung jawab Anda sendiri.


Ada rumor mengatakan overclocking dapat menghilangkan garansi, jadi garansi tidak berlaku walaupun belum expired. Nah, tetapi disamping itu aku banyak menemui kasus orang yang hardwarenya rusak karena overclocking, tetapi garansinya tetap berlaku.

Langkah 1 - Identifikasi Komponen

Sebelum memulai overclocking, investigasi terlebih dahulu spesifikasi PC anda. (Motherboard, RAM/Memory , Processor , VGA Card, PSU (Power Supply Unit) )

Langkah 2 - Merek Hardware Yang Cocok Untuk Overclocking

Cari tahu lebih dalam lagi tentang chipset yang motherboard yang kalian pakai. Chipset ini berguna untuk mengetahui seberapa besar kemampuan motherboard dalam membantu overcklocking kinerja processor kalian. Berikut ini daftar chipset-chipset dari INTEL yang kemampuannya sudah bisa untuk dioverclock lebih dahsyat. Oh ya, biasanya untuk mengetahui chipset apa yang kalian gunakan di motherboard kalian, bisa liat tipe mobo (Motherboard) kalian menggunakan software Lavalys Everest misalnya. Misal Asus Abit IX-38 Quad GT berarti memakai chipset Intel X38.

Chipset Intel

P965
P35
X38
P48
X48
P45
X58 (Core i7 / Nehalem)


Daftar chipset kalian tidak ada di sini? Tidak perlu khawatir, pada dasarnya OC tidak dipengaruhi oleh jenis chipset yang kalian gunakan. Cuman, kalo pake chipset yang ada di atas, hasil OC yang kalian dapat bisa lebih dahsyat. Misalnya kalian masih pake chipset lawas semacam 915P, 945P, hasil yang kalian dapatkan sangat kecil. itu aja koq...

AMD Phenom ll X6 Saingan intel i7


Apa Prosesor tercepat saat ini ? mungkin ingatan anda akan langsung tertuju pada intel core i7 980X,Tapi berapa banyak dari anda yang rela merongoh kocek cukup dalam untuk memilikinya ?
AMD memiliki kinerja yang baik,tidak selalu berbanding lurus dengan harga yang tinggi.

Sejak era Phenom generasi pertama,AMD memulai tren baru.Mereka menawarkan prosesor berinti lebih banyak ketimbang saingannya pada satu titik harga pasar.Pendekatan pasar yang cukup efektif ini sepertinya membguat AMD “ketagihan”.Ketika prosesor hexa-core milik intel diluncurkan,kita tahu bahwa pilihan alternative dari AMD juga akan segera keluar.Tentunya produk AMD ini akan lebih murah dibandingkan produk intel,Mengingat track record AMD sebelumnya.

AMD Phenom ll X6 diluncurkan untuk menjawab permintaan pasar dan fansnya.Kemunculan ini sekaligus memanaskan kembali persaingan dengan rivalnya yang sudah terlebih dahulu meluncurkan prosesor berinti enam.Bersamaan dengan peluncuran perdana dua varian Phenom ll X6(1055T dan 1090T),AMD juga mengenalkan chipset baru yakni 890 GX/FX.

Untuk menemani Phenom ll X6 ini.Kombinasi antara Phenom ll X6 1090T,890 GX/FX serta radeon HD seri 5000 menghasilkan platform baru yang disebut “Leo”.Walaupun Phenom ll X6 1090T memiliki jumlah inti sebanyak enam buah,teknologi yang digunakan pada inti prosesornya tersebut tidak berbeda dengan keluarga Phenom ll sebelumnya.Pasalnya,chip ini masih menggunaka arsitektur yang sama.Jadi pada dasarnya,AMD hanya memampatkan enam buah inti tersebut kedalam “wadah” yang sama dengan Phenom ll X4.kesamaan teknologi ini juga termasuk TDP nya yang sama dengan pemilik nama kode(code name) ”Thuban” ini tetap hadir dengan sesuatu yang baru.

Mengenai Sandy Bridge Prossesor Intel

Prosesor Intel Core generasi ke-2, yang banyak dikenal dengan codenameSandy Bridge’, memiliki arsitektur yang baru, performa yang sangat fenomenal, dan overclockability yang luar biasa (mencapai 5.4Ghz dengan pendingin HSF). Maka dari itu, ada beberapa orang yang merasa bahwa mengupgrade sistem lama ke Sandy Bridge akan menghadirkan peningkatan performa yang signifikan.


Apakah Anda salah satu diantaranya? Nah, sebelum anda pergi ke Mangga Dua dan mengganti sistem lama Anda, ada baiknya Anda membaca artikel ini terlebih dahulu!

Seperti halnya setiap hardware baru yang dirilis, Sandy Bridge memiliki sedikit karakteristik ‘unik’ yang membuatnya berbeda dengan hardware lain, berikut ini diantaranya :


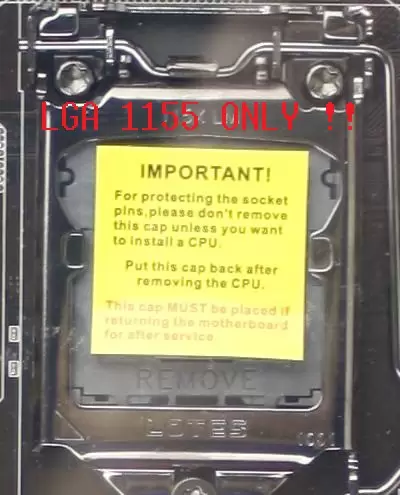
1. CPU LGA1155 TIDAK kompatibel dengan LGA1156


Hal ini terdengar cukup simple, namun begitulah adanya. Jika saat ini Anda ingin menggunakan prosesor Sandy Bridge yang menggunakan soket LGA1155, mau tidak mau Anda harus membeli motherboard yang menggunakan soket LGA1155. Tidak ada backward-compatibility antara CPU LGA1156 dan LGA1155. Satu-satunya hal yang sama dari LGA1155 dan 1156 adalah lubang untuk mounting HSFnya, sehingga Anda masih dapat menggunakan HSF LGA1156 pada prosesor Sandy Bridge LGA1155 Anda.


2.Prosesor K-Series vs Non-K-Series, apa bedanya?

Jika Anda menyimak berbagai model prosesor Sandy Bridge yang akan dirilis pada artikel kami yang sebelumnya, Anda akan menyadari bahwa ada beberapa prosesor yang memiliki model number yang sama, namun mempunyai akhiran ‘K’. Prosesor yang memiliki akhiran ‘K’ seperti i5-2500K dan i7-2600K adalah prosesor yang disebut sebagai prosesor K-Series, sedangkan prosesor tanpa akhiran ‘K’ seperti i5-2300 dan i5-2500 disebut prosesor non-K-Series.

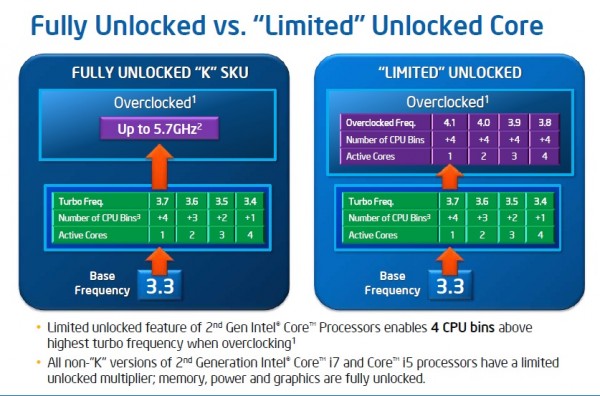
Yang perlu Anda ketahui adalah tidak ada perbedaan clockspeed antara varian K-series dan Non-K series. Satu-satunya perbedaan antara K-series dengan Non-K adalah semua prosesor K-series memiliki multiplier yang tidak dikunci yang memungkinkan overclocking CPU via multiplier.

Gambar berikut ini akan menjelaskan perbedaan antara prosesor i5 2500K dan i5-2500 :


Sabtu, 22 Oktober 2011

Install Ubuntu 11.10 Oneiric Ocelot di Macbook

Ubuntu Oneiric sudah resmi bisa digunakan pada pertengahan Oktober tepatnya tanggal 13 Oktober 2011, pada awalnya saya juga tidak tertarik dengan Ubuntu Ocelot, karena masalah tidak suka dengan tampilan Unity dari Ubuntu. Tapi lambat hari setelah melihat beberapa tangkapan layar teman teman facebook, saya cukup tergoda untuk mencobanya pada MacBook Pro 8.1 yang saya miliki. Saya cukup yakin untuk menginstall Ubuntu Oneiric pada MacBook Pro walaupun belum ada dokumentasi dari Team MacTel saya putuskan tetap mengistallnya. Untuk tahap awal saya hanya mencobanya dengan live cd, setelah puas mencoba saya putuskan juga untuk mengistall langsung pada MacBook Pro 8.1. Beberapa test perangkat keras yang saya kerjkan pada Ubuntu Oneiric yang akan saya pasangkan di MacBook Pro 8.1 ini cukup berjalan lancar kecuali wireless bcm4331. Untuk segi pengenalan hardware Ubuntu Oneiric ini lebih bagus digunakan dari pada Ubuntu Natty yang masih banyak konfigurasi hardware pada Macbook Pro 8.1 Seperti pada tulisan saya sebelumnya. Untuk langkah installasi Ubuntu Oneiric cukup mudah tinggal install melalui CD semuanya sudah teratasi seperti hardware VGA Intel HD, Multitouch Trackpad, FacetimeHD Camera, Sound, Blutooth, CardReader, Kontrol Kecerahan Layar dan Keyboard Bakclight semua berjalan lancar kecuali wireless bcm4331 perlu melakukan sedikit kompilasi driver.

Installasi Refit MacOSX
Untuk tahap pertama installasi Ubuntu Oneiric pada Macbook Pro adalah memasang applikasi Refit pada Mac OSX bisa didapatkan di sini. Kemudian lakukan installasi refit pada MacOSX anda. Buka Installer Refit kemudian klik rEFit.mpkg dilanjutkan installasi Refit hingga selesai

kemudian buka terminal anda ketikkan perintah berikut untuk mengaktifkan otomatis Refit pada Boot Pertama sebelum masuk System.
$ sudo sh /efi/refit/enable-always.sh 
Langkah selanjutnya menyiapkan Partisi hardisk untuk Ubuntu, yang bisa anda buat menggunakan aplikasi Disk Untility pada Mac OSX, buka Spotlight - tekan - Command + Space -- ketikan - Disk Untility, buat partisi kosong kurang lebih 12 GB (11 GB linux system dan 1 GB linux swap) 


  • Unduh Ubuntu Oneiric Mac Arsitektur 64bit kemudian burning ke dalam CD
  • Masukkan CD Ubuntu Oneiric dalam CDROM diikuti dengan menekan tombol C pada keyboard, agar MacBook bisa booting dalam media CD.
  • Kemudian lakukan installasi Ubuntu seperti biasanya, pada partisi kosong yang anda siapkan.
  • Setelah Installasi Ubuntu Selesai masuk Refit, kamudian masuk dalam boot Ubuntu kemudian konfigurasi hardware MacBook Pro 8.1 pada Ubuntu Oneiric
Wireless Airport - BCM4331
Wireless Macbook Pro 8.1 menggunakan broadcom bcm4331 sampai saat ini Ubuntu Oneiric belum mendukungnya untuk driver bcm4331 untuk mengatifkan driver bcm4331 perlu sedikit kompilasi driver bcm4331 Macbook Pro di Ubuntu Oneiric
Install beberapa aplikasi yang digunakan di Ubuntu untuk buid dan kompilasi driver:
sudo apt-get install build-essential make pacth
Setelah installasi aplikasi untuk kompilasi selesai, Unduh berkas yang diperlukan untuk kompilasi driver BCM4331
Sources Prorietary Broadcom Driver 43XX 


Jadikan satu bekas driver yang diunduh dalam satu direktori bernama bcm4331
$ mkdir bcm4331


Kemudian masuk dalam direktori bcm4331 kemudian kompilasi dengan patch driver bcm4331
$ cd ~/bcm4331
$ tar xf compat-wireless-2011-08-27.tar.bz2
$ tar xf patch_bcm4331.tar.bz2
$ cd compat-wireless-2011-08-27/
$ patch -p1 < ../bcm4331-1.patch
$ patch -p1 < ../bcm4331-2.patch
$ patch -p1 < ../bcm4331-3.patch


Langkah selanjutnya mengaktifkan driver b43
$ scripts/driver-select b43


Aktifkan PHY_HT dengan mengedit berkas config.mk, hapus tanda pagar pada pada baris 276 :
$ gedit config.mk
Sunting berkas config.mk pada baris 276 :
...
CONFIG_B43_PHY_HT=y
...


Setelah menyunting bekas config.mk selesai dilanjutkan kompilasi dan installasi compact wireless driver
$ make
$ sudo make install
$ cd ..


Langkah selanjutnya kompilasi b43-fwcutter
$ tar xf b43-fwcutter-015.tar.bz2
$ cd b43-fwcutter-015
$ make


Ekstrak Berkas Firmware BCM43XX Broadcom Proprietary  

$ tar xf ../broadcom-wl-5.100.138.tar.bz2
$ export FIRMWARE_INSTALL_DIR="/lib/firmware"
$ sudo ./b43-fwcutter -w "$FIRMWARE_INSTALL_DIR" broadcom-wl-5.100.138/linux/wl_apsta.o
$ cd ..

Kemudian Unload Semua Modul yang berhubungan dengan wireless
$ cd compat-wireless-2011-08-27
$ sudo make wlunload

Untuk memastikan modul b43 dimuat pada saat reboot, tambahkan modul b43 yang baru saja dikompilasi :
$ sudo modprobe b43
Tambahkan modul b43 pada berkas /etc/modules agar bisa aktif pada saat system startup
$ sudo echo 'b43' >> /etc/modules
Agar driver b43 aktif kembali pada saat system suspend dan hibernate, perlu menambahkan parameter suspend modul pada berkas /etc/config.d/defaults
$ sudo echo 'SUSPEND_MODULES = "b43"' >> /etc/pm/config.d/default
Setiap upgrade kernel atau menggunakan kernel lain, reload ulang driver compact driver menggunakan perintah dibawah :

$ cd ~/b4331/compat-wireless-2011-10-09
$ make clean
$ make
$ sudo make install 

Multitouch Trackpad

Untuk Trackpad pada Ubuntu Oneiric sudah berjalan lancar tanpa konfigarasi driver, Oneiric juga sudah mendukung multitouch seperti pada MacOSX, multitouch seperti mencubit dan menyapu atau memutar obyek menggunakan 2 jari sudah bisa berjalan lancar :) 
1 Jari - klik kiri
2 Jari - klik kanan, horizotal & vertical scrolling,  pinch & zoom, dan rotate

3 Jari - Move Window
4 Jari - Memanggil Applikasi


Konfigurasi Trackpad Multitouch cukup masuk setting manager pilih Mouse & Touchpad kemudian cek 2 finger scrooling, seperti gambar dibawah :


Applikasi tambahan Touchégg untuk memodifikasi Multitouch Trackpad pada MacBook Pro
Touchégg Apps
wget http://touchegg.googlecode.com/files/touchegg_0.2-maverick_amd64.deb
Touchégg Apps GUI
wget http://touchegg.googlecode.com/files/touchegg-gui_0.2-maverick_amd64.deb


Installasi Touchégg Multitouch
sudo dpkg -i touchegg_0.2-maverick_amd64.deb
sudo dpkg -i touchegg-gui_0.2-maverick_amd64.deb


Sound & Subwoofer 
Konfigurasi sound Ubuntu Oneiric pada Macbook Pro 8.1 cukup menggunakan alsamixer, tidak perlu konfiguarasi seperti pada Ubuntu Natty. Ketikkan perintah berikut pada terminal, kemudian setting alsamixer seperti tangkapan layar di bawah. Tekan huruf 'M' untuk menonaktifkan mode sunyi (mute)   
alsamixer


IntelHD & Video Out
Tahap selanjutnya adalah menkonfigurasi ekternal monitor pada port mini display MacBook Pro. Kernel 3 sudah mendeteksi driver vga Intel HD 3000 dengan baik tinggal menkonfigurasi untuk menampilkan secara otomatis  tampilan monitor eksternal pada saat mini port display dimasukkan. Pada kasus ini saya menggunakan aplikasi ubuntu yaitu Multiple Screen menggunakanya adalah mempermudah pengaturan layar monitor eksternal seperti pada tulisan saya yang membahas Multiple Screen :)
sudo apt-get install grandr
Untuk mengkonfigurasi Multiple Screen masukkan Port Mini Display to VGA kemudian konfigurasi resolusi pada layar utama pada resolusi 1024x768, kemudian klik apply. Untuk ekstenal monitor saya menggunakan Multiple Screen secara otomatis sudah bisa tampil ke layar eksternal tanpa konfigurasi ulang setelah menkonfigurasi resolusi layar pada multiple screen.


FacetimeHD Camera 
Mengatifkan Camera disini saya tidak terlalu menggunakan Camera, maka saya cuma mengistallkan aplikasi sederhana untuk sekedar mengatifkan fitur kamera. Untuk mengatifkan camera saya menggunakan Aplikasi Cheese. Installasi cheese sebagai berikut. Buka terminal kemudian ketikkan perintah dibawah :
sudo apt-get install cheese
Konfigurasi Ubuntu pada MacBook Pro 8.1 selsai, untuk perangkat lain seperti Eternet Gigabit, Bluetooth, Microphone, Keyboard, back light keyboard, short cut keyboard, Card reader SDXC semuanya berjalan lancar, Thunterbolt dan Firewire  pada Ubuntu Oneiric belum ditesting :D.  Untuk tangkapan layar Ubuntu Oneiric berjalan lancar jaya di MacBook Pro 8.1 pada gambar dibawah. :) 

Kamis, 20 Oktober 2011

File system security

In your unixstuff directory, type
% ls -l (l for long listing!)
You will see that you now get lots of details about the contents of your directory, similar to the example below.
File and directory access rights
Each file (and directory) has associated access rights, which may be found by typing ls -l. Also, ls -lg gives additional information as to which group owns the file (beng95 in the following example):
-rwxrw-r-- 1 ee51ab beng95 2450 Sept29 11:52 file1
In the left-hand column is a 10 symbol string consisting of the symbols d, r, w, x, -, and, occasionally, s or S. If d is present, it will be at the left hand end of the string, and indicates a directory: otherwise - will be the starting symbol of the string.
The 9 remaining symbols indicate the permissions, or access rights, and are taken as three groups of 3.
  • The left group of 3 gives the file permissions for the user that owns the file (or directory) (ee51ab in the above example);
  • the middle group gives the permissions for the group of people to whom the file (or directory) belongs (eebeng95 in the above example);
  • the rightmost group gives the permissions for all others.
The symbols r, w, etc., have slightly different meanings depending on whether they refer to a simple file or to a directory.

Set Up Mandriva Linux & XP for a Dual Boot

How to Set Up Mandriva Linux & XP for a Dual Bootthumbnail
Dual booting will allow you to select Mandriva or Windows XP as your computer starts up.
Mandriva is one of many different distributions of the Linux operating systems. Linux components are developed by volunteer developers. Companies that create Linux distributions package these components in unique ways and create installation routines to make installing Linux more simple. Mandriva has chosen to include a component with installation that makes setting up a computer to dual boot Mandriva and Microsoft Windows XP much easier. The component installed by Mandriva, and many other Linux distributions, is Grand Unified Bootloader, or GRUB.
Difficulty:
Moderate

Instructions

Things You'll Need

Windows XP installation mediaMandriva installation media

schedule release history Mandriva

Date Name main src main i586 main x86_64 contrib src contrib i586 contrib x86_64 Total SRPMS Total i586 Total x86_64
2010-12 2010.2
2010-07 2010.1-farman 2948 7601 7566 8479 12618 12493 11427 20219 20059
2009-11 2010.0-adelie 2919 7340 7298 7927 11933 7299 10856 19273 14597
2009-04 2009.1- 2828 6981 6936 7719 11689 11536 10547 18670 18472
2008-10 2009.0- 2849 6861 6830 7158 11109 10931 10007 17970 17761
2008-04 2008.1- 2744 6401 6332 6893 10974 10726 9637 17375 17058
2008-01 2008.1-Cooker 2695 6596 6321 6668 9363 17520 16778 15959 23841
2007-10 2008.0-Tycho 2654 6084 5967 6384 9038 16119 15678 15122 22086
2007-04 2007.1-spring 2524 5502 5472 6006 8904 8515 8530 14406 13987
2006-12 2007.1-Cooker 2444 5251 5252 5775 9076 8264 8219 14327 13516
2006-10 2007 2408 5123 4913 5584 8200 7554 8039 13323 12605
2005-08 2006 2044 4211 4628 7263 7274 12306 11474 7274
2005-04 2005-LE 1855 3853 4098 6023 6256 10689 10109 6256
2004-10 10.1-Cty 1676 3511 3556 5141 5532 9459 9043 5532
2004-03 10.0-Cty 1548 3150 2905 4290 4711 8131 7861 4711
2003-09 9.2-fivestar 1445 2916 2429 3533 4012 6847 6928 4012
2003-03 9.1-bamboo 1289 2564 1752 2491 3041 5055
2002-09 9.0-dolphin 1215 2259 1320 1853 2535 4112
2002-03 8.2-bluebird 1211 2116 927 1171 2138 3287
2001-09 8.1-vitamin 1181 2030 742 828 1923 2858
2001-03 8.0-traktopel 1088 1768 619 781 1707 2549
2000-09 7.2-odyssey 977 1553 977 1553
2000-05 7.1-helium 672 1327 672 1327
2000-01 7.0-air 689 1001 689 1001
1999-09 6.1-helios 845 845
1999-05 6.0-venus 717 717
1999-02 5.3-festen 634 634
1998-12 5.2-leeloo 617 617
1998-07 5.1-venice 551 551

Senin, 17 Oktober 2011

Fixing Skype Error in Ubuntu 11.10 Oneiric Ocelot

Since Ubuntu 10.10 Skype always available in every ubuntu official repository, even though there are always a choice for ubuntu user to download Skype from its official website, it's better for us to install Skype from a repository because it's has been adjusted with every Ubuntu release.

In this release, Ubuntu 11.10 Oneiric has Improved handling of 32-bit compatibility on amd64 systems, in other word this mean `some package` may use a same library for 32-bit and 64-bit. 32-bit libraries will always be available at the same time as their 64-bit counterparts, even in the case of security updates, and users will only need to install those 32-bit libraries needed by the applications they have installed.
Problems that usually accour when Install Skype in Ubuntu 11.10, especially user who install from standalone installer from Skype website (*.deb), is give following error message :
skype: error while loading shared libraries: libXss.so.1: cannot open shared object file: No such file or directory
a problem above usually because the unavailability of libXss.so because it is not available in 64-bit, to solve the problem above can be done in two ways, here are :

Install Conky Metro UI Style Windows 8 for Ubuntu 11.10

a while after Microsoft launched new OS Windows 8 `Beta` with actually using new Interface named Metro UI, many people feels love with it. The interface that feels fresh, functional, simple and good looking are very fascinating, and there is some concern about the fate of Ubuntu 11.10 Oneiric Ocelot is it still boom as ever.

For Ubuntu User, you do not need to worry because you can taste the Metro UI atmosphere without leaving Ubuntu, kant-o on their Deviantart has made a theme/skin for conky which makes us feels have a Windows 8 in our desktop.


How to Install Conky Metro Style 'Windows 8' Widget for Ubuntu
Here are step by step to make Metro UI Style Widget in your ubuntu,  some application that required is Conky.

Install conky in your Ubuntu
first step is install conky, you can install conky through Ubuntu Software Center (find it using keyword `conky`) or using terminal using this command :
sudo apt-get install conky-all
Create conky directory in your home folder
 mkdir ~/.conky && cd ~/.conky

Install Mozilla Thunderbird unseats Evolution in Ubuntu 11.10


thunderbird-ubuntu
Add caption
While not nearly as popular as its web browser cousin, Mozilla Thunderbird is nevertheless one of the most widely-used desktop email applications around. On June 28th 2011 Thunderbird 5 was released, packing nearly 400 performance and stability fixes, improved wizards and tab handling, and an an updated add-on manager like the one that debuted in Firefox 4. It’s also Thunderbird’s first rapid release version, so we’ll wait and see if some system administrators have the same beefs about long-term support and breakage with Thunderbird as they did with Firefox.
For now, however, there’s some additional good news for the Thunderbird team. Canonical has released the second alpha of Ubuntu 11.10 Oneiric Ocelot, and one of the most significant changes is to its default applications. After a lengthy tenure as Ubuntu’s pre-installed email client, Evolution has been booted — replaced by Mozilla’s blue, avian postman. The switch comes at an interesting time, what with Mozilla’s own Asa Dotzler having recently aired a number of gripes against Thunderbird on his personal blog and announcing that he’d be switching to Postbox.

how to Configure Additional Repositories


Before you install any additional packages it's best to first install the Synaptic Package Manager since it lets you download multiple packages at a time easily. Open a terminal (Dash > Terminal) and enter
sudo apt-get install synaptic
Some packages like the Adobe Reader are not available in the standard Ubuntu repositories. The easiest way to make such packages available to your system is to add the Medibuntu repository.
Again, open a terminal and edit /etc/apt/sources.list...
sudo gedit /etc/apt/sources.list
... and enable the oneiric partner and Ubuntu Extras repositories (if they are not already enabled):
[...]
## Uncomment the following two lines to add software from Canonical's
## 'partner' repository.
## This software is not part of Ubuntu, but is offered by Canonical and
the
## respective vendors as a service to Ubuntu users.
deb http://archive.canonical.com/ubuntu oneiric partner
deb-src http://archive.canonical.com/ubuntu oneiric partner 

## This software is not part of Ubuntu, but is offered by third-party
## developers who want to ship their latest software.
deb http://extras.ubuntu.com/ubuntu oneiric main
deb-src http://extras.ubuntu.com/ubuntu oneiric main 
[...]

new in ubuntu 11.10 oneiric

Ubuntu 11.10 Oneiric Ocelot is marching ahead. Through our detailed reviews of Alpha 2 and Alpha 3 releases, we followed Ubuntu 11.10 in its each and every developmental phase so far. A lot of things have changed since the third alpha release and as we had promised, here is a preview of latest round of changes in Ubuntu 11.10 and a quick screenshot tour.
whats new in ubuntu oneiric

Ubuntu Software Center is in the limelight yet again. Software Center overhaul is in full swing and the good news is, no need to wait till Ubuntu 12.04 to see the changes for yourself, its already happening with default Ubuntu Software Center in Ubuntu 11.10. More details on the latest round of Software Center related improvements can be found here.

ubuntu oneiric software center

GNOME Shell in Ubuntu 11.10

GNOME Shell and Unity are the two new approaches towards creating the ultimate desktop experience by GNOME Foundation and Canonical respectively. Both approaches stirred up fair amount of controversies, with personalities like Linus Torvalds going so far as to call GNOME Shell an unholy mess. But things aren't that bad, or are they? Let's find out.

GNOME Shell in Ubuntu 11.10 Review

Firefox 7 Beta Arrives in Ubuntu 11.10

Firefox 7 beta is now the default web browser in Ubuntu 11.10 Onceric Ocelot beta and for the first time ever, Firefox scores a perfect 100 in Acid3 tests. Congratulations Mozilla!

Firefox 7 Beta Firefox 7 Beta Arrives in Ubuntu 11.10, Scores a Perfect 100/100 in Acid3 Test

Acid3 Tests and Web Browsers
Acid3 test is a web test page from the Web Standards Project that checks a web browser's compliance with elements of various web standards, particularly the Document Object Model (DOM) and JavaScript. Acid3 test was launched on 3 March 2008 by Ian Hickson, a Google employee and the tests became popular with the advent of Google Chrome which scored a perfect 100 in Acid3 tests and reignited the browser wars.

When all the other popular browsers like Opera and Safari along with Google Chrome soared in terms of performance, Firefox and IE consistently under performed. But that's changing now. Firefox has recently decided to shift to a rapid release cycle mode(like Google Chrome) and the move is already starting to give results.

Firefox nightly builds ubuntu

The first screenshot shows the results of Acid3 tests in Firefox 7.0 beta, which is the default web browser in upcoming Ubuntu 11.10 Oneiric Ocelot. This one above shows the results of Acid3 tests in Firefox 9 Alpha running in Ubuntu 11.04 Natty Narwhal. Yes, both score a perfect 100. Learn how to install Firefox 9.0 Alpha in Ubuntu 11.04 Natty Nawhal.

Firefox 9 Alpha 1 Ubuntu 11.04

Growing and going strong LibreOffice in ububtu 11.10

A year after the fork: LibreOffice is growing and going strong
Today marks the one-year anniversary of The Document Foundation (TDF) and the LibreOffice project, a promising community-driven fork of OpenOffice.org (OOo). The project has seen considerable growth during its first year of existence. TDF estimates that there are now 25 million LibreOffice users worldwide.
TDF and LibreOffice were originally founded in response to the long-standing governance problems that have historically afflicted OOo. Under Sun's leadership, bureaucratic barriers and concerns about the project's copyright assignment policy impeded participation in OOo development. Friction between Sun, independent community members, and other corporate contributors created an unhealthy environment for collaboration. The problems only worsened after Oracle's acquisition of Sun.
Some key OOo project members banded together to create the LibreOffice fork—based partly on Novell's excellent Go-OO patchset—and decided to establish TDF to provide a truly vendor-neutral setting for future development. The early TDF participants initially hoped that Oracle would embrace the effort and be willing to participate on equal footing with other community members. Unfortunately, Oracle wasn't interested in aligning with the community's vision and forced TDF backers to step down from the OOo community council—thus formalizing the split.

Compiz running on Ubuntu 11.10 (Oneiric)

Ubuntu 11.10 will not include the classic GNOME desktop which is available alongside Unity in Ubuntu 11.04. Instead, Unity 2D will be installed to provide the Unity desktop even on systems without 3D graphics capabilities. Fortunately for fans of the old desktop, it will still be available to install from the repositories.
Install the classic GNOME desktop by installing the gnome-panel package.
sudo apt-get install gnome-panel
Before you log in, click the gear icon and select GNOME Classic. This will give you a traditional GNOME desktop with top and bottom panels and the Compiz window manager. If you don’t want Compiz’s desktop effects, select the GNOME Classic (No effects) option for the Metacity window manager instead.
If you have problems with the theme being messed up and gnome-settings-daemon crashing, make sure you have installed any available updates. I had this problem before upgrading my Ubuntu 11.10 Beta 1 installation.
Ubuntu classic desktop in 11.10

Installing Ubuntu 11.10 on the Eee PC 901

I haven’t had time yet to rebuild my main system with Ubuntu 11.10, so I did a fresh install on my netbook to try it out. My Eee PC 901 originally shipped with Linux, but it was very Ubuntu unfriendly until 9.04. Since then, all the hardware has been well supported by Ubuntu.
Ubuntu 11.10 desktop on Eee PC
As usual, I ran the installer from a bootable USB drive created with Ubuntu’s Startup Disk Creator. Ubiquity, the Ubuntu installer, is more polished than ever in this release. It can now turn on the webcam to take an account picture, which worked perfectly with the built in webcam. I encountered two minor installer bugs: an incorrect report that the system’s name already exists on the network, and the window becoming taller than the screen.
I wish that I could have aborted the language pack downloads during the install. Since the repository mirror was slow, they took over an hour to fetch.
Disk IO seems to really slow the system down. The Eee PC 901 has dual solid state drives: one 4 GB and one 16 GB which is slightly slower. This time, I installed Ubuntu to the slower but larger drive because I’ve had trouble keeping enough free space while installed to the smaller one. I might have to switch back to the faster drive to speed things up again. Using Chromium is a big improvement to Firefox, which freezes up briefly while accessing the disk. Even without the disk issue, Unity feels a bit sluggish on this 3 year old netbook. There’s a noticeable delay drawing menus and opening the dash.
There are a few bugs to work out:
  • Dragging with the touchpad is now very difficult.
  • I had the touchpad stop working entirely once (a USB mouse continued working). I haven’t been able to reproduce this.
  • I couldn’t get the launcher to appear with the mouse after it auto-hid. After closing the windows I had open, the problem went away. I haven’t been able to reproduce this.
  • The system seems to have started randomly having kernel panics today. One happened while copying a file to a flash drive, and another while filling out the bug report for the first.
I’ve never had a problem with Ubuntu as severe as the kernel panic crashes. Fortunately I don’t rely on the netbook for much right now.

Sushi File Previewer in Ubuntu 11.10 Unity

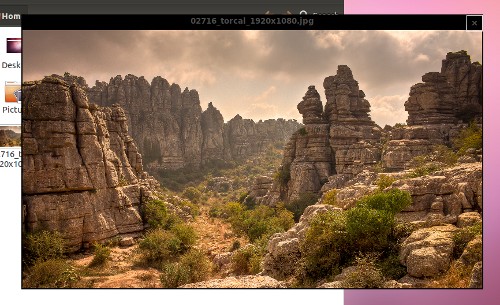
One of the new features in GNOME 3.2 is quick file preview. Pressing space while a file is selected in the file browser will open a window with a preview of the file contents. Previews of images, videos, music, PDF documents, and more are supported.
Sushi quick file previewer on Ubuntu 11.10
The preview feature is provided by an application called Sushi. Since GNOME and Ubuntu Unity use the same file browser, no configuration is needed to use Sushi in Ubuntu.
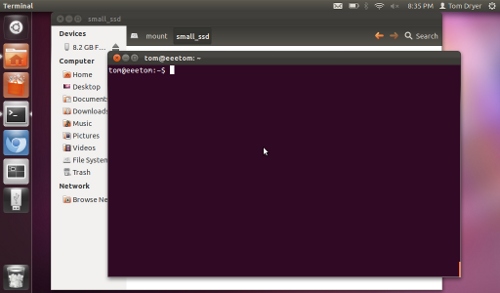
Search for and install gnome-sushi in Ubuntu Software Center, or install it from the terminal:
sudo apt-get install gnome-sushi
Sushi has a plain black user interface, but features nice animated effects when zooming in and out of images, and slick transparent controls over videos. Since Sushi runs in the background once it’s started, it should appear fast when launched.
The file preview feature isn’t very discoverable. The only way to launch Sushi seems to be pressing space while a file is selected.
There seems to be some minor issues with Sushi and Ubuntu’s theme. Also, Sushi doesn’t play very well in VirtualBox. It sort of worked in Unity 2D, but under any compositing window manager it had major problems. I’ll have give it another try once Ubuntu 11.10 is out and I have it installed on a real system.

How-to Change Boot Order (boot grub) in Ubuntu 11.04

If you’re dual booting Ubuntu with other Linux distributions or Windows, you may wish to change the which operating system starts by default. Ubuntu uses the GRUB boot loader to display a menu of installed operating systems and boot them. If you don’t see the menu before Ubuntu starts, hold down the shift key while your system starts up.
This guide is intended for Ubuntu 11.04 and 11.10, which both use GRUB version 1.99. If you’ve upgraded from an older Ubuntu installation, you may still have an older version of GRUB. Search in Ubuntu Software Center for grub-pc and check the version if you’re not sure.
There’s a graphical configuration tool for GRUB called StartUp-Manager. Unfortunately, judging by its reviews in Ubuntu Software Center the application has not been updated for the latest version of GRUB and has some problems. But if you’re comfortable with editing a configuration file and running some terminal commands it’s not difficult to change the default operating system manually.
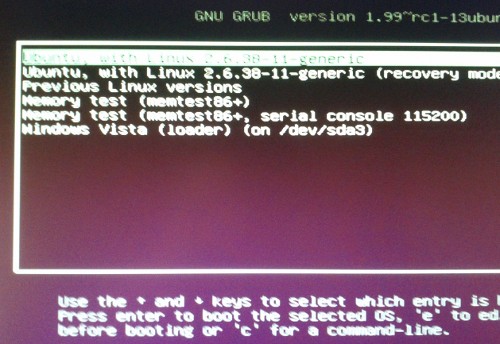
a GRUB menu with Ubuntu and Windows

How-to Install Adobe Flash Player 11

Release candidate 1 of Flash 11 is available from Adobe. As well as 3D graphics support, users of 64-bit systems will be pleased that Flash 11 will be 64-bit native. This means that the old workaround for running Flash in 64-bit browsers will no long be needed.
[update: Flash 11 has been released, and the final version is now available from the Ubuntu repositories.]
Here’s how to install Flash 11 in recent versions of 64 or 32-bit Ubuntu:
  1. If you’ve already installed Flash, you’ll need to remove it first. If you installed it from the Ubuntu repository, make sure the packages flashplugin-installer and flashplayer-downloader are removed.
    sudo apt-get remove flashplugin-installer flashplayer-downloader
  2. Go to Adobe’s download page for Flash 11 and select either the 32 or 64-bit tar.gz archive download for Linux.
  3. Extract the libflashplayer.so file from the downloaded archive.
  4. Open the file browser and navigate to .mozilla in your home directory. Since this is a hidden folder, you’ll need to press Ctrl+L and type the path in, or enable the Show Hidden Files option in the View menu in order to get to it.
  5. Create a folder called plugins if it doesn’t already exist, and move the libflashplayer.so file into it.
  6. Restart your browser.
Firefox or Chromium (which will load plugins from the same directory as Firefox) should now have Flash 11 installed.
You can also use an unofficial PPA with Flash 11 packages (make sure you trust a PPA’s owner before adding it).

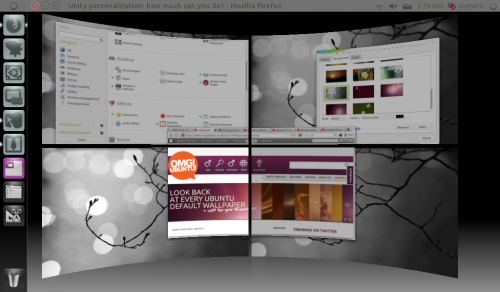
Unity personalization in ubuntu

In such a short time of development, improvements in speed, aesthetics, usability and more have come to life in the Compiz version of Unity. But, what about customization?  €œIf you have no will to change it, you have no right to criticize , a wise man once said.
The purpose here is not to teach you in detail how to customize the various options, but rather to just show you where they are and that they do exist. As for creating a style, that’s up to your creativity!

Unity panel/icons to follow users theme

Considered by many as the “killer app” on linux, theming returned to Ubuntu on February 17, 2011. Tweakers rejoice! The theme applies to the panels and everything else like it used to. The icons of the launcher now adheres to your chosen icon set as well. Cool.
Changing wallpaper, icons, theme.
The icons in the launcher can be moved around or completely removed as well.

Unity Compiz options allow changing animations, panel transparency, size & more

The options to choose between 'Blink' or 'Pulse' animations on launching apps and apps demanding attention is available. Optionally both can be set to 'None'. The transparency of the panel can be chosen along with the size of the launcher. Personally I set the panel a bit smaller for use on my netbook and made my panel slightly transparent because it looks sexy.
Personalized panel & launcher.

Put your own twist to your Workspaces

As I read through the comments of some users from different posts, many thought that the gray reflexion area when the Workspace Switcher is activated is too large. Although being a mandatory Icon in Unity, it does not mean users can’t change it up. Simply open Compiz Config, go to the Expo settings and there you go! Change every detail you can think of.
Here is my end result:

Putting a curve on Workspaces.

Unity Lenses: Endless possibilities!

In 11.04,2 lenses are included (previously named places). The Files Lens and the Applications Lens. Where it gets interesting is that you can create and add lenses to the shell as you please. Still in early stages of implementation, lenses add a depth of customization never before seen. Many hope once there is enough lenses out there that they will be easily available from the Software Center. Here are some great ideas from some of you awesome readers:
  • AskUbuntu Lens
  • Package Lens
  • Active Project Lens
  • RSS Lens
  • Inbox Lens
  • People Lens

And so much more!

A lot of people seem to forget that nearly all the personalization from Classic Ubuntu can still be used with Unity. Screenlets are back in development and work just fine with the new Desktop Ubuntu. The much loved Faenza Icons & Nautilus-Elementary can still rock out Natty. The almighty Compiz Fusion is in full force with all of it’s power too.
Ubuntu 11.04: same great Ubuntu, all new features.
Like what you see? We would love to see how you readers can personalize Natty! Post images in the comments bellow.

Sabtu, 15 Oktober 2011

Ubuntu 11.10 (Oneiric Ocelot) Tips ‘n’ Tricks

Ubuntu 11.10 (Oneiric Ocelot) is expected to release on 13th of this month, I’ve tried the beta versions. Few months ago, just after the release of Ubuntu 11.04, I published a post on Ubuntu 11.04 Tips ‘n’ Tricks, and it was a big hit – I got a lot of positive feedback. In fact, it was lot useful for a beginner Ubuntu users – specifically those who are coming from the Windows background. Some of the tips explained there are also valid for 11.10 (perhaps for all version of Ubuntu or may be for all Linux based OS) but most of the tricks are obsolete due to some major change like GTK 3 (instead of 2.3).
That’s why I thought to write an updated version of those cool tips ‘n’ tricks, and the expected users are absolute beginners but intermediate and advanced users might benefit from it. If you’ve just installed a fresh version of Ubuntu 11.10 then first go through this post – 10 things to do after installing Ubuntu 11.10, then come back here and apply some tips/tricks  to customize the Ubuntu in your way.


So here is my most favorite collection of Tips and Tweaks, for a beginner Ubuntu 11.10 user. If you have something to say (e.g if you want to add or improve an existing tips or you want to share you experience or have some feedback) then feel free to share with us (using comment box).

Top 10 – Ubuntu 11.10(Oneiric Ocelot) Tips ‘n’ Tricks

The tips and tricks described here, are primarily aimed for Ubuntu 11.10 users but some of the tips may works seamlessly with other Linux distributions (specifically Debian based) such as Linux Mint, Opensuse, Fedora, Debian, or other Ubuntu derivatives such as Kubuntu, Xubuntu, Edubuntu, MythUbuntu, Ubuntu Studio etc. So feel free to experiment but – always keep a backup to encounter any unexpected results.

1. Try GNOME Shell

Ubuntu 11.10 uses Gnome 3 (based on GTK 3) but the default user interface is Unity. Unity has improved a lot, but if you want to try something new or you like Gnome 3 (or you might be hating Unity), then it’s time to enjoy the next generation revolutionary desktop – GNOME 3. Gnome 3.2 is the latest version. It has a lot of new and innovative features.
Oneiric Ocelot Tips Trick Top Tips and Tricks for Ubuntu 11.10 Oneiric Ocelot